Hunza-Pakistan

Learn to earn online!

Here you will find your way to earn through internet.

Hunza-Tech

Hunza-Tech shares the most updated information about how to earn online with its users. This website specifically focuses on Lates SEO / SMM Blogging and content monetization techniques.

Keep on visiting Hunza-Tech.

We constantly update you about the best available and latest Online Earning and Learning resources.

Make your blog / website more income generative!

Here we will be sharing our practical experience of effective SEO Friendly blogging techniques to drive more a traffic.

Hunza-Tech

Well planned Blog / Website with proper marketting returns well. We let you know about the effective blogging and SEO to get more from your blog.

Thursday, March 2, 2023

Python Learning Series 02- Install python step by Step


Step No. 01:

Downloading the Python Installer

Please follow the following step to download, Install and Configure Python on your Windows Laptop/PC:
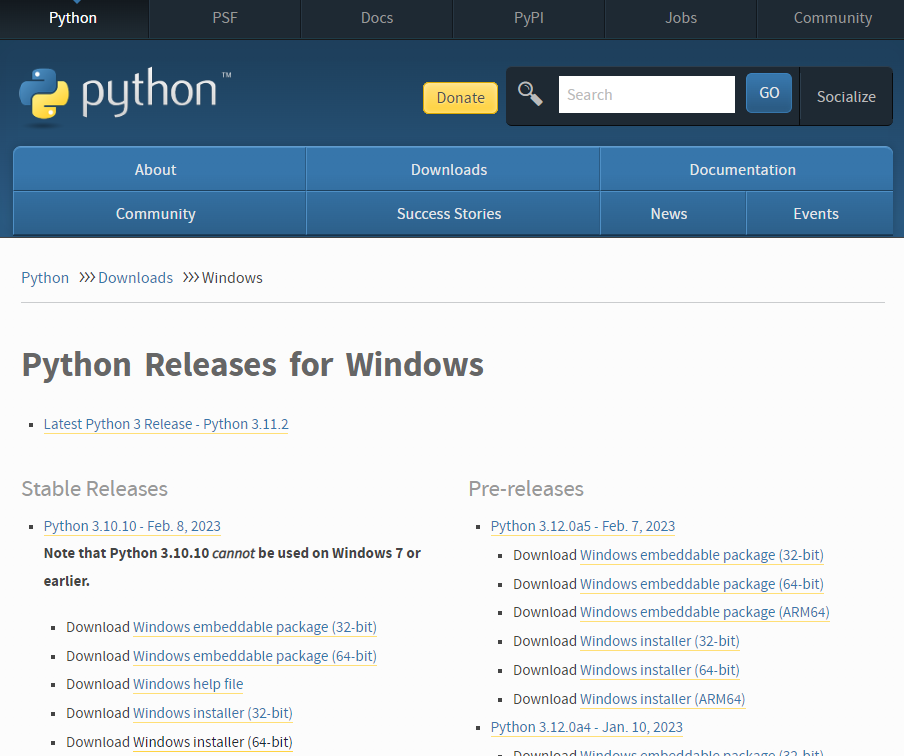
  1. Go to the official Python download page for Windows.

  2. Find a stable Python 3 release. This tutorial was tested with Python version 3.10.10.

  3. Click the appropriate link for your system to download the executable file: Windows installer (64-bit) or Windows installer (32-bit)

  4. Download Python Installer

  5. Step 2 — Running the Executable Installer

    1. After the installer is downloaded, double-click the .exe file, for example python-3.10.10-amd64.exe, to run the Python installer.

    2. Select the Install launcher for all users checkbox, which enables all users of the computer to access the Python launcher application.

    3. Select the Add python.exe to PATH checkbox, which enables users to launch Python from the command line.

      Customize Installation

    4. If you’re just getting started with Python and you want to install it with default features as described in the dialog, then click Install Now and go to Step 4 - Verify the Python Installation. To install other optional and advanced features, click Customize installation and continue.

    5. The Optional Features include common tools and resources for Python and you can install all of them, even if you don’t plan to use them.

      Python Optional Features

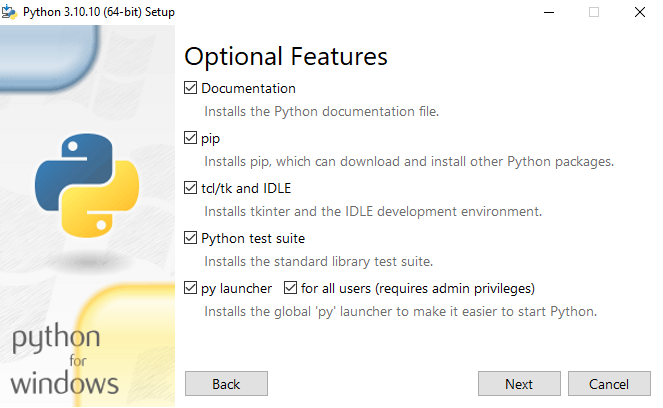
      Select some or all of the following options:

      • Documentation: recommended
      • pip: recommended if you want to install other Python packages, such as NumPy or pandas
      • tcl/tk and IDLE: recommended if you plan to use IDLE or follow tutorials that use it
      • Python test suite: recommended for testing and learning
      • py launcher and for all users: recommended to enable users to launch Python from the command line
    6. Click Next.

    7. The Advanced Options dialog displays.

      Python Advanced Options

      Select the options that suit your requirements:

      • Install for all users: recommended if you’re not the only user on this computer
      • Associate files with Python: recommended, because this option associates all the Python file types with the launcher or editor
      • Create shortcuts for installed applications: recommended to enable shortcuts for Python applications
      • Add Python to environment variables: recommended to enable launching Python
      • Precompile standard library: not required, it might down the installation
      • Download debugging symbols and Download debug binaries: recommended only if you plan to create C or C++ extensions

      Make note of the Python installation directory in case you need to reference it later.

    8. Click Install to start the installation.

    9. After the installation is complete, a Setup was successful message displays.

      Python setup was successful

    Step 3 — Adding Python to the Environment Variables (optional)

    Skip this step if you selected Add Python to environment variables during installation.

    If you want to access Python through the command line but you didn’t add Python to your environment variables during installation, then you can still do it manually.

    Before you start, locate the Python installation directory on your system. The following directories are examples of the default directory paths:

    • C:\Program Files\Python310: if you selected Install for all users during installation, then the directory will be system wide
    • C:\Users\Sammy\AppData\Local\Programs\Python\Python310: if you didn’t select Install for all users during installation, then the directory will be in the Windows user path

    Note that the folder name will be different if you installed a different version, but will still start with Python.

    1. Go to Start and enter advanced system settings in the search bar.

    2. Click View advanced system settings.

    3. In the System Properties dialog, click the Advanced tab and then click Environment Variables.

    4. Depending on your installation:

      • If you selected Install for all users during installation, select Path from the list of System Variables and click Edit.
      • If you didn’t select Install for all users during installation, select Path from the list of User Variables and click Edit.
    5. Click New and enter the Python directory path, then click OK until all the dialogs are closed.

    Step 4 — Verify the Python Installation

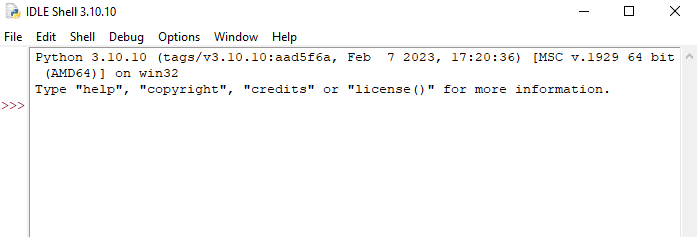
    You can verify whether the Python installation is successful either through the command line or through the Integrated Development Environment (IDLE) application, if you chose to install it.

    Go to Start and enter cmd in the search bar. Click Command Prompt.

    Enter the following command in the command prompt:

    python --version
    

    An example of the output is:

    Output
    Python 3.10.10

    You can also check the version of Python by opening the IDLE application. Go to Start and enter python in the search bar and then click the IDLE app, for example IDLE (Python 3.10 64-bit).

    Verify if Python is installed using IDLE app

    You can start coding in Python using IDLE or your preferred code editor.

    What we did?

    We have installed Python on our Windows 10 computer and are ready to start learning and programming in Python. Bravo!! We are ready to write our firs Program in Python! 

Python Learning Series 01

Python Learning Series for absolute beginners!

In this learning series, we will quickly have an introduction of most popular programming language,  Python!

What is Python?

Python is a high-level, interpreted programming language that is designed to be easy to read and write. It was first released in 1991 by Guido van Rossum, and since then it has become one of the most popular programming languages in use today.

Why Python is so popular nowadays?

Python is known for its simplicity and ease of use, which makes it an ideal language for beginners. It is also a versatile language that can be used for a wide variety of tasks, from web development and data analysis to machine learning and artificial intelligence.

Python is an interpreted language, which means that code is executed line by line as it is written, rather than compiled into machine code beforehand. This makes it easier to write and test code, and it also makes Python code more portable, since it can be run on any platform that has a Python interpreter installed.

Python is an open-source language, which means that it is free to use, modify, and distribute. It has a large and active community of developers who contribute to its development and provide support to new users. 

So, guys this is a gentle introduction to this amazing programming language. Follow the upcoming posts for more learning. In the next tutorial we will start directly learning learning of how to download and configure python on your Desktop PC / Laptop. 

Next!

Tuesday, February 28, 2023


 Machine learning is a subfield of artificial intelligence that involves developing algorithms and statistical models that enable computer systems to automatically learn from data and improve their performance on a specific task.


In other words, machine learning algorithms enable computers to identify patterns and relationships within a dataset, and use that knowledge to make predictions or decisions about new data. This is done by training the machine learning model on a labeled dataset, where the correct outputs are known, and then using that trained model to make predictions on new, unlabeled data.

There are several types of machine learning, including supervised learning, unsupervised learning, and reinforcement learning. Supervised learning involves training a model on labeled data, while unsupervised learning involves finding patterns in unlabeled data. Reinforcement learning involves training a model through a system of rewards and punishments, in order to optimize its decision-making abilities. Machine learning has numerous applications across a wide range of industries, from healthcare and finance to marketing and entertainment.


Tuesday, August 2, 2022

Learning AngularJS step by step!

Introduction:
AngularJS is a very popular Framework which is written in JavaScript. AngularJS is normally available as a JavaScript file,  whichcan be added to any of your  web page with the following script tag:

<script src="https://ajax.googleapis.com/ajax/libs/angularjs/1.6.9/angular.min.js"></script>

AngularJS extends the functionality of  HTML with  the following ng-directives.

1. ng-app directive:

The ng-app directive defines an AngularJS application.

2. ng-model directive:

The ng-model directive binds the value of HTML controls (input, select, textarea) to application data.

3. ng-bind directive:

The ng-bind directive binds application data to the HTML view.

4. ng-init directive: 

The ng-init directive initializes AngularJS application variables.

5. AngularJS Expressions:

In AngularJS expressions  are written inside double Curly Brackets (Braces)

The following example script illustrates the uses of above mentioned directives and Expressions:

<!DOCTYPE html> //This indicates the start of an HTML file
<html>
<script src="https://ajax.googleapis.com/ajax/libs/angularjs/1.6.9/angular.min.js"></script>
<body>

<div ng-app=""> //Here the ng-app directive is used to indicate that this div will have AngularJS Application code
  <p>My first expression: {{ 88 + 5 }}</p> //Here in this paragraph, the 88+5 expression is inserted with double curly brackets.
</div>

</body>
</html>